
Adding captcha to a login form helps keep bots from flooding the server with fake sign-in attempts. These aren’t always brute force attacks. Most of the time, it’s just a script sending automated requests to try random usernames, passwords, or behaviors that burn through resources and slow things down for everyone else. To make it harder for that traffic to get through, many developers turn to third-party captcha services like Google reCAPTCHA, hCaptcha, or Cloudflare Turnstile. They’re designed to check that a real person is interacting with the form without needing you to build that logic yourself.
Spring Boot doesn’t come with built-in captcha features, but it gives you everything you need to make it work. You drop the provider’s HTML and JavaScript into your form, pick up the captcha response when the user submits it, and send that over to the provider to verify before doing anything with the login credentials. That quick check up front gives you a way to stop invalid traffic early without having to run extra authentication steps first.
Handling Captcha in the Login Flow
Captchas aren’t about catching every bad request, but they’re a good first step in slowing down anything automated. The idea is to place something in the path of a login attempt that a script can’t breeze through. Most third-party captcha services are designed to drop into a form with very little setup on your part, and they hand back a token that proves the challenge was completed.
That token is what the backend cares about. It’s short-lived, tied to a session, and doesn’t carry sensitive data on its own. Once it lands in your Spring Boot app, you can use it to check with the captcha provider before moving on to the rest of the login flow.
Captcha Setup in the Frontend Form
Before Spring Boot ever sees the request, the form needs to load the captcha widget and let the user interact with it. That can be as simple as pasting in the provider’s JavaScript and placing a special div inside the form. For a setup like Google reCAPTCHA v2, this takes just a few lines of HTML.

After the challenge is complete, the reCAPTCHA script adds a token to the form under the name g-recaptcha-response. That gets posted along with the rest of the form data when the user submits it. Keep in mind that some frontend frameworks interfere with native form behavior, especially those that intercept submissions or use JavaScript routing. If that’s the case, you’ll need to make sure the token still gets attached and sent with the login request.
For developers working with vanilla forms, though, this works out of the box. You won’t see the token in the browser unless you inspect the form closely, but it’ll be there when the request hits the backend.
Receiving the Captcha Response in the Backend
Spring Boot handles form inputs by binding them to request parameters, so pulling out the captcha response is as easy as reading any other field. You don’t need a separate model or custom parser to grab it.
In a controller method, it looks like this:

But that’s just the first step. The real check happens when you take that token and send it to the captcha provider’s verification endpoint. That call confirms whether the token is valid, tied to your secret key, and hasn’t expired or been reused.
A dedicated service class can handle this. Here’s an example that works with reCAPTCHA:

When that service is in place, you can use it from your controller or security filter. Passing the user’s IP address gives you a little extra protection, since some providers use it to track abuse or detect suspicious patterns.
You don’t need to decode the full response unless you want to log errors or track failures. A true or false return is enough to block or allow the request.
Blocking the Request if Captcha Fails
The goal here is to short-circuit the login process before any authentication logic kicks in. That includes password checks, token generation, or database calls. If the captcha didn’t pass, nothing else should run. You can do this inside a controller by checking the captcha first, but a better spot is just before authentication, where Spring Security handles filters. That lets you catch the request as soon as it arrives, check the token, and reject it if needed.
Here’s a filter that watches login POSTs and blocks them if the captcha token doesn’t pass verification.
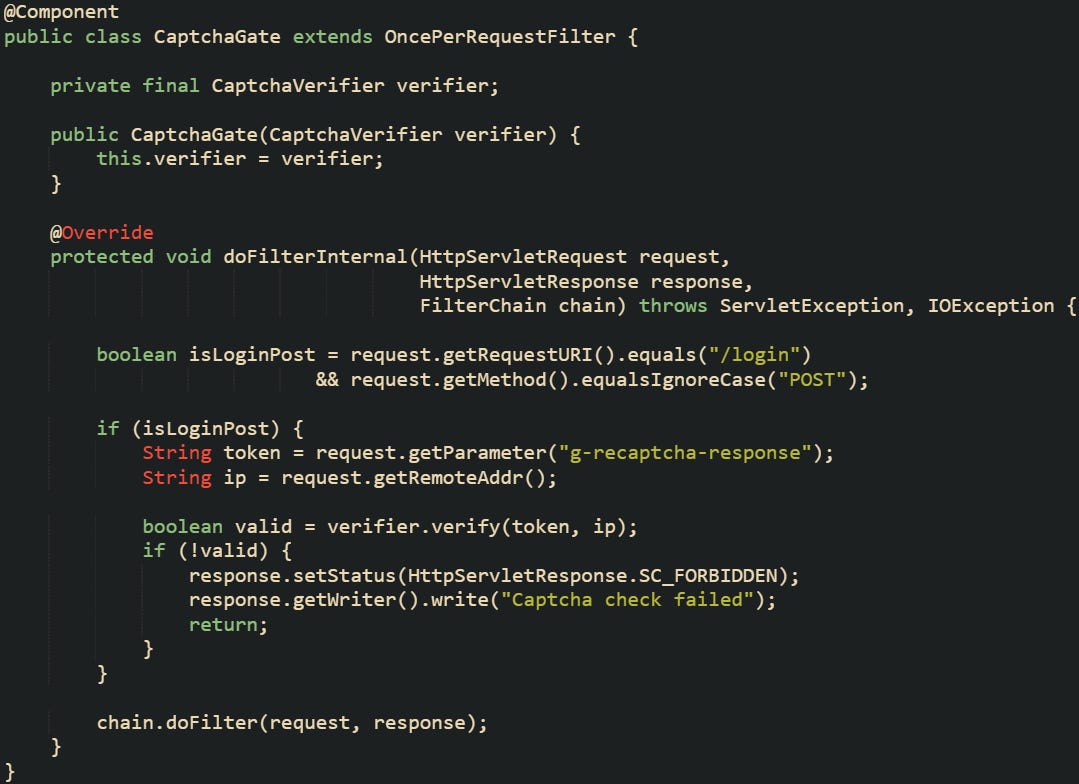
This filter stops the request early, writes a message back to the client, and doesn’t let the request continue to the next stage. That means no login is attempted, no logs are written, and no session is created. If you’re working with JSON-based requests instead of form data, you’ll need to read the body differently, but the concept stays the same. Grab the captcha token, pass it to your service, and stop the request if it doesn’t check out.
This keeps the backend from wasting time on bad requests and keeps your actual login handler focused only on verified traffic.
Common Scenarios and Fail Conditions
Logic for Captchas often works as expected during early testing, but once it’s deployed or opened to the public, edge cases start to show up. Some are tied to how requests are made, others to how tokens expire or fail silently. It helps to think through how these pieces behave when something is missing, skipped, or mismatched before building extra features on top of them.
If your login flow sometimes works and sometimes doesn’t, the behavior usually points back to one of these.
Skipping Captcha on GET Requests
Captcha only needs to be enforced during login attempts. That usually means watching for POST requests on a specific path. If your filter or controller tries to enforce validation on other types of traffic, things start to break. You don’t want to intercept the page load for the login form, the CSS or JavaScript tied to it, or background resources like logos and favicons. Those usually come in as GET requests. Trying to validate those will either throw errors or block things that should be allowed without restriction.
To avoid that, make sure your captcha check is only running when it’s actually needed. This check helps:

You can wrap your captcha check inside a condition like that to avoid blocking anything that doesn’t need to be validated. The path and method should both match before trying to extract the token or hit the verification service.
For apps that rely on a different login path or use JSON APIs instead of form posts, just match the actual path your frontend is sending the request to. The structure stays the same, but the route or payload may shift.
A useful habit is to add a logger in that block, just to confirm that only the right requests are triggering the validation.
This helps confirm the filter isn’t running more often than it should, which can be hard to spot when working in development mode.
Handling Missing or Expired Captcha Tokens
When users submit a login form without completing the captcha challenge, the backend receives no token at all. This happens more than you’d expect. Sometimes the JavaScript widget never finished loading. Other times the form was auto-filled and submitted by browser extensions or password managers before the captcha was ready.
There’s also a short window where a token is valid. After a few minutes, the provider no longer accepts it. If a user steps away from the login page and then comes back to hit submit later, the token gets rejected, even if it looked fine in the form. You can catch both of these cases in the same spot, by checking for the presence of a token before calling the provider. If it’s missing, the request should be blocked right away.
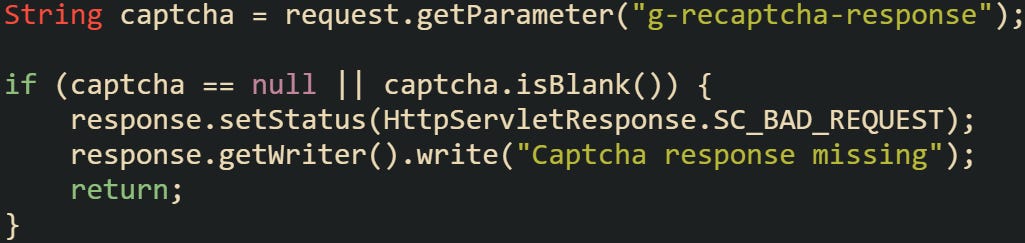
This kind of pre-check keeps your logs from filling up with unnecessary calls to the verification service and makes error tracking easier. It also gives you more control over what to show on the frontend. Some apps choose to send a 400 status for this, others return a 403 and show a message like Captcha required before login.
To detect expired or invalid tokens, you’ll want to inspect the response body from the captcha provider. They’ll usually return a JSON object that includes a success flag and sometimes an error-codes array.
You can extract those values like this:
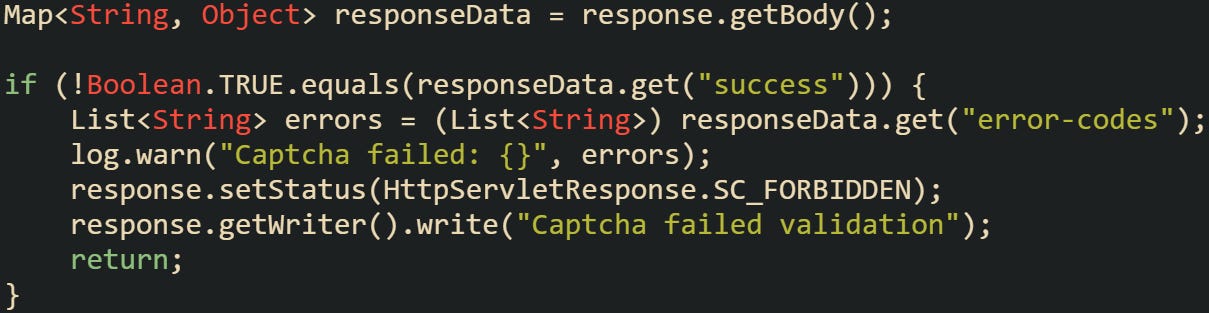
This gives you a clearer view of what went wrong, and it can help you troubleshoot patterns later on. If you see a lot of timeout-or-duplicate errors, that usually means people are sitting on the login page too long before submitting.
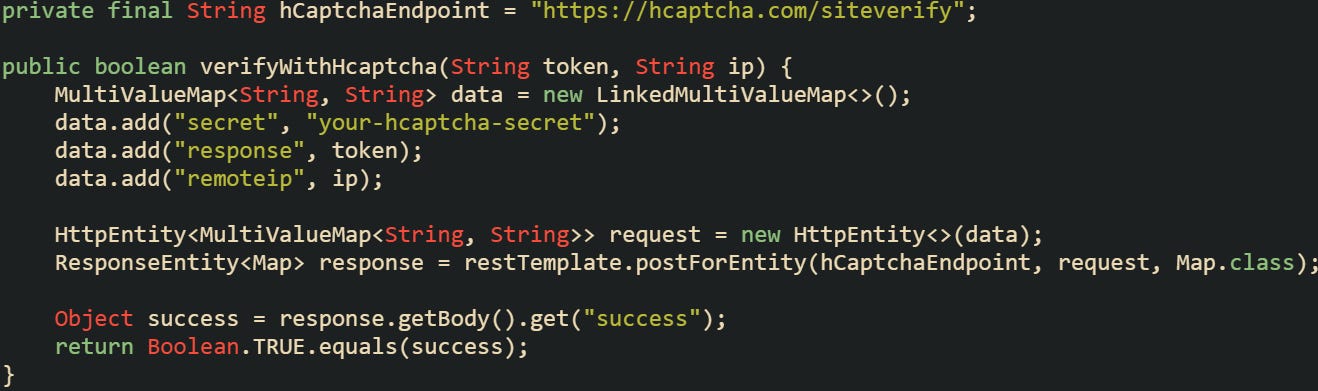
Using hCaptcha or Cloudflare Turnstile Instead
Google reCAPTCHA gets used a lot, but it’s not the only option out there. Some apps prefer hCaptcha or Cloudflare Turnstile because they offer different policies, features, or costs. The logic in your Spring Boot app doesn’t change much if you decide to use one of these instead. You just update the frontend snippet and the server-side verification endpoint.
For hCaptcha, the frontend script looks like this:

When the form is submitted, it sends a field named h-captcha-response, not g-recaptcha-response. That’s the only change you need to account for in your backend.
Here’s how to verify the hCaptcha token:
Cloudflare’s Turnstile works the same way conceptually, but with a different field name and verification URL. The widget adds a field named cf-turnstile-response, and the backend checks it at https://challenges.cloudflare.com/turnstile/v0/siteverify.
Whichever service you pick, just make sure the backend matches the field name used in the form. That’s usually the most common mistake when switching providers. If the token name doesn’t match, the server ends up reading a null or empty value and the captcha check always fails, even when it looked like it worked in the browser.
Each of these services handles abuse in slightly different ways, but from the Spring Boot side, the mechanics stay consistent. You collect the token, send it to their API, and check the success flag before moving forward.
Conclusion
Blocking fake login traffic early doesn’t need to be complicated. By placing a captcha check at the right point in the request flow, you can stop bots before they reach authentication. The browser collects the token, the server reads it from the form, and a quick call to the provider tells you if it’s valid. Spring Boot doesn’t come with this built in, but it gives you everything you need to stitch those steps together. The result is a login process that stays focused on real users, with less overhead from automated traffic trying to slip through.

Educating in all form. Thank you for educating. Looking forward to read more from you.