
Many APIs need a way to check that requests are coming from trusted clients before any data is handed out. A common way to handle this is through header based authentication. With this method, the client sends a token inside the HTTP headers of every request, and the server reads that token to decide if access should be allowed. Spring Boot supports this by running requests through its filter chain and security context, where custom logic can be added to catch and validate those headers.
How Header Based Authentication Works
Header based authentication depends on how HTTP requests travel from a client to the server and how Spring Boot processes those requests before a controller ever sees them. Each request carries headers that can hold values beyond standard ones like Content-Type. This space is where tokens live, and Spring’s filter chain is where they’re checked. The sequence stays the same every time, the request arrives, the header is read, the token is inspected, and then a decision is made on if the request moves forward or is stopped.
HTTP Headers and Tokens
HTTP headers are part of every request, and they serve as small carriers of metadata that servers can read without touching the body. Clients can attach headers that are standard, like Accept, or custom, like X-API-KEY. With header based authentication, the server expects a token inside one of these headers on every call. Without it, the request is incomplete and should be rejected before reaching protected resources.
A basic request with a header can look like this when sent with curl:

This request includes a custom header named X-API-KEY, and the value abc123xyz is what the server checks against its list of valid tokens. Tokens like this are usually long and randomly generated to make them hard to guess. Some systems instead use JWTs, which carry both the client’s identity and expiration details inside the token itself.
Spring makes header values easy to access inside a controller or service through the HttpServletRequest.
That code just echoes the token, but it shows how headers are immediately available for inspection once a request arrives. A controller wouldn’t normally validate the token directly, but seeing how to grab it makes the mechanics less abstract.
Spring Security Filter Chain
Requests in a Spring Boot application pass through a sequence called the filter chain before reaching controllers. Each filter has the chance to check, modify, or block the request. Authentication filters sit near the start, which means they see the request headers right away. A filter has full control over whether a request continues. If the header is missing or doesn’t match a valid token, the filter can return a 401 Unauthorized response immediately. That way, requests that fail authentication never touch business code.
To see how early this happens, here’s a minimal filter that logs the headers before letting the request continue:
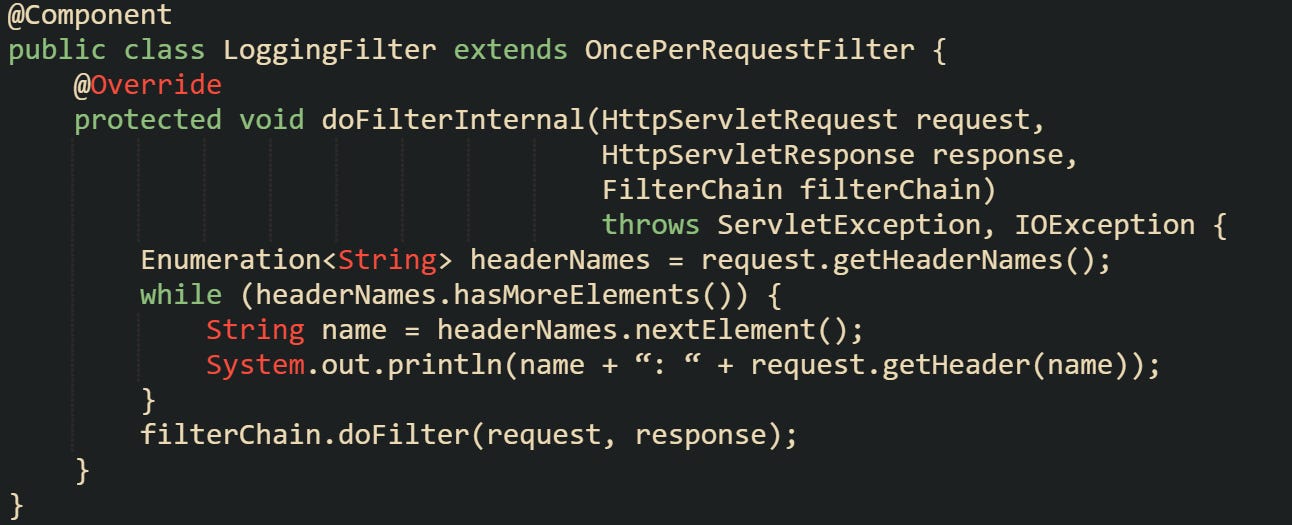
That filter prints every header and then moves the request down the chain. A real authentication filter would replace that loop with logic that checks for a specific header and validates its value.
When a token is valid, the filter usually sets up an Authentication object and stores it in the SecurityContextHolder. That step connects the request to Spring Security’s authentication model, making the identity available for later checks in controllers and services.

This ties a successful token check into Spring Security’s context. Business logic can then ask who made the request or enforce rules around access.
Token Validation Mechanics
Token validation is the final step, and the exact details depend on the type of token you use. Static tokens are compared against values that the server already knows. JWTs are parsed and verified against a signature. Opaque tokens may require a call to another service. Regardless of format, the goal is to confirm if the token should be trusted at that moment.
Static tokens are the most direct to work with. A configuration property or database entry holds the valid values. The filter compares the incoming header against them.

JWTs require a few more steps. They’re base64 encoded and signed so that tampering can be detected. To validate, you decode the token, verify the signature, and check claims like expiration.
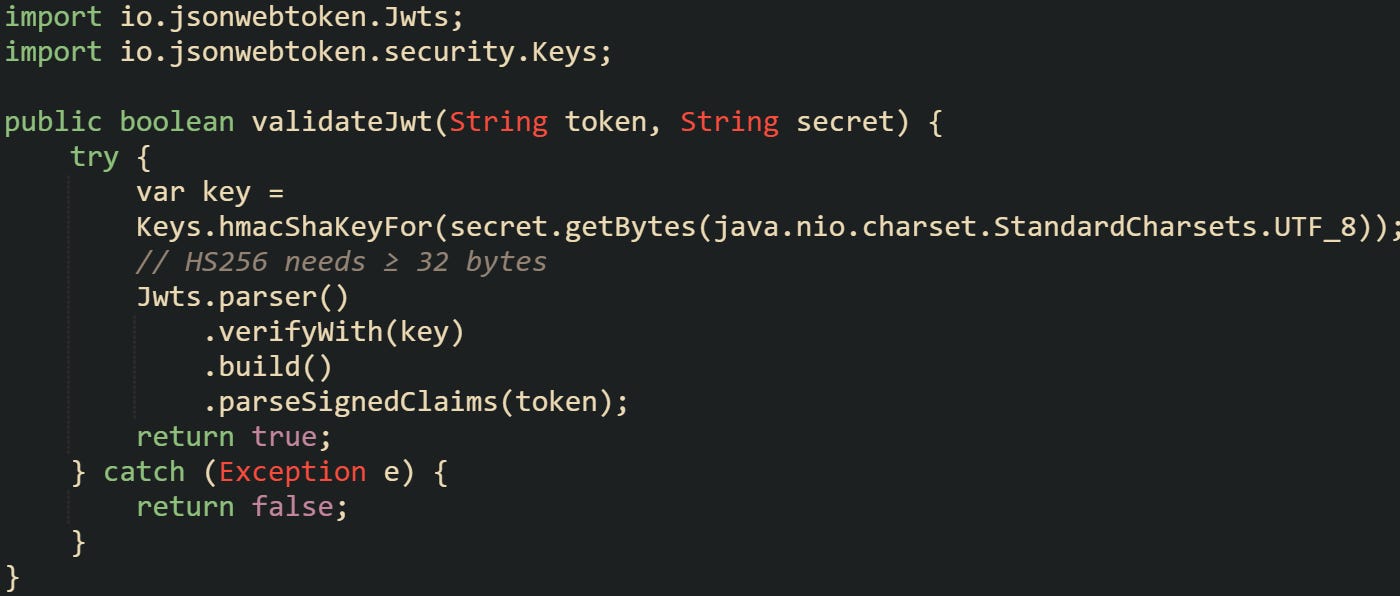
That method uses the jjwt library to verify the token’s signature. If parsing fails, the token is invalid. When parsing succeeds, claims like exp can be checked to decide if the token is still current.
Opaque tokens move validation away from the Spring application. Instead of parsing or comparing locally, the filter calls out to an authorization server, which replies with whether the token is valid. That adds a network call but keeps token management centralized.
Each style of token has trade-offs. Static tokens are easy to get started with but require secure handling to avoid reuse problems. JWTs reduce lookups by carrying identity and expiry inside themselves, but they must be carefully managed to prevent long-lived tokens from being abused. Opaque tokens centralize control but add latency and external dependencies.
Implementing Header Based Authentication in Spring Boot
Spring Boot gives developers the building blocks needed to enforce authentication without rewriting how HTTP requests are processed. The foundation comes from Spring Security, which provides a filter chain that can be extended to include header checks. From adding the dependency to securing controllers, the steps flow naturally when built one on top of the other.
Adding Spring Security Dependency
A project that doesn’t already have Spring Security needs to pull in the starter module. Maven projects add it to the pom.xml, while Gradle projects add it to build.gradle.

With Gradle, the declaration looks like this:

This brings in the filter chain, authentication manager, and supporting infrastructure. Without this starter, any custom filter you create won’t have the same integration with Spring’s security context. Spring Boot auto-configures sensible defaults as soon as the starter is on the classpath, which means your application already has a filter chain ready before you add anything custom.
Creating a Custom Authentication Filter
Filters give you access to a request before the controller runs. For header based authentication, that’s the right place to check tokens. The most common base class to extend is OncePerRequestFilter, which guarantees the filter runs once during each request’s processing.
A minimal example looks like this:
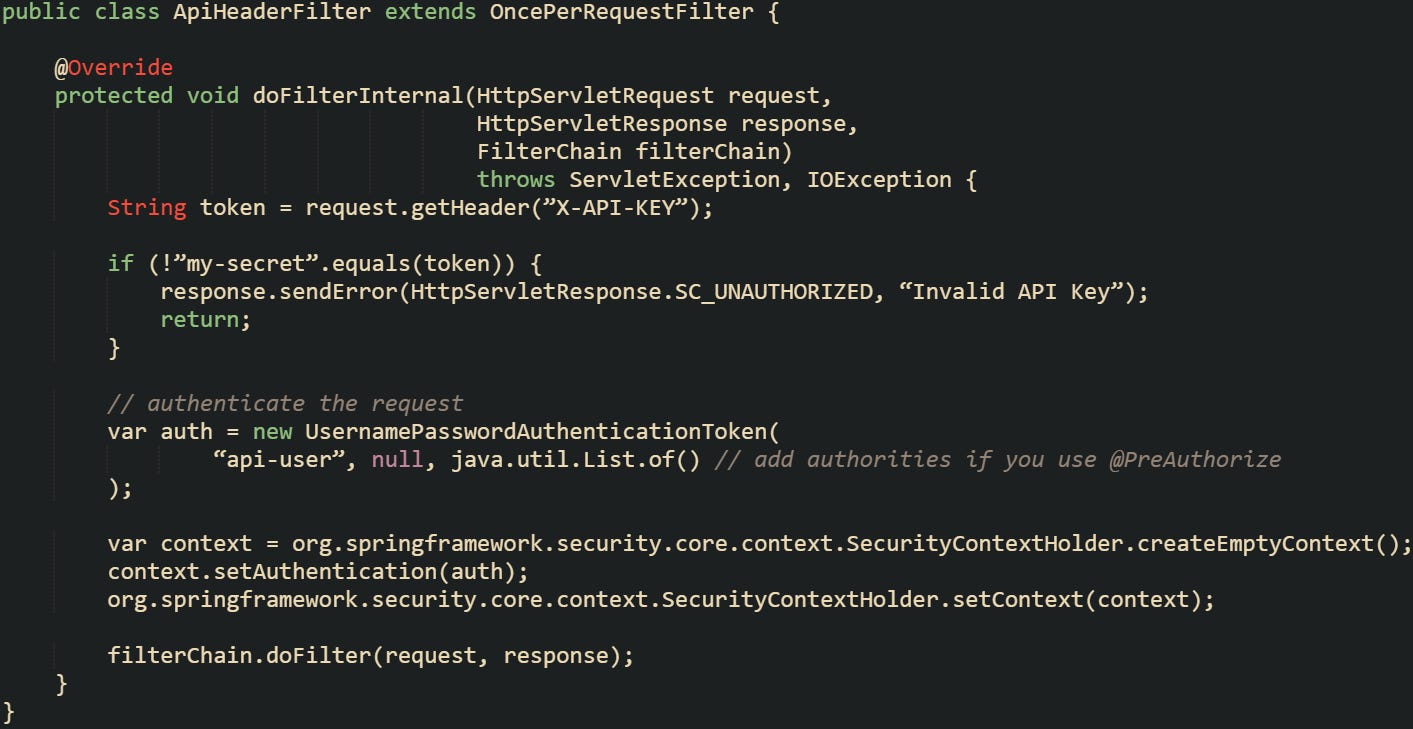
This filter checks for a single static token. In practice, you’ll expand it with real validation logic, such as looking up tokens in a database or verifying a JWT.
There are cases where you don’t want to filter every request. Spring makes it possible to skip paths by overriding shouldNotFilter:

This keeps health checks and public endpoints accessible while still securing everything else. The ability to conditionally skip filtering is useful when building APIs that mix public and private endpoints.
Registering the Filter in Security Configuration
Creating the filter is only part of the process. It needs to be added to the Spring Security chain so it executes in the right place. In current versions of Spring Boot, you no longer extend WebSecurityConfigurerAdapter. Instead, you define a SecurityFilterChain bean inside a configuration class.
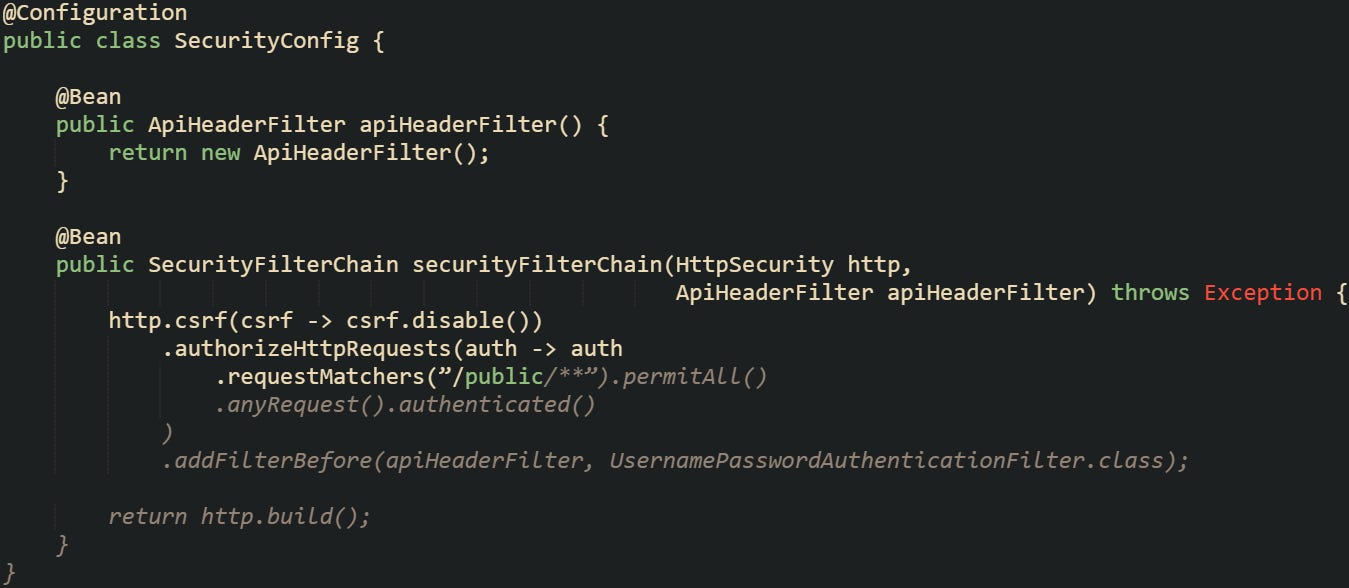
The filter here is added before the built-in username and password filter. That positioning is important because you want to intercept headers early.
Protecting Endpoints
After the filter is in place, controllers don’t need extra checks inside their code. Spring Security blocks unauthenticated requests before they reach the controller. That separation keeps endpoint methods focused on business logic.
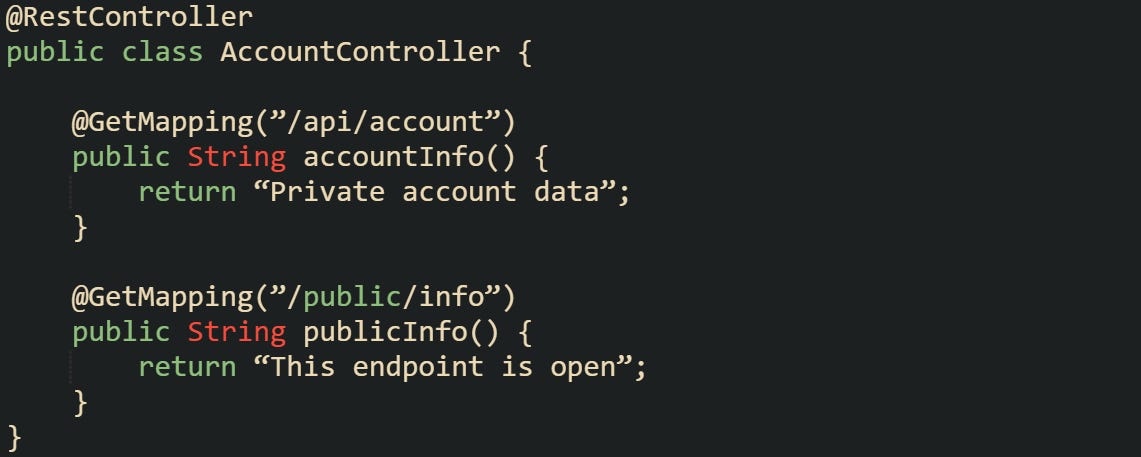
The accountInfo endpoint will only return data if the header passes validation, while publicInfo can be reached without any header.
Sometimes you want more than just a binary allow-or-deny decision. If your filter creates an Authentication object and sets it in the security context, Spring Security annotations like @PreAuthorize become available.

With this, a token can be tied to specific permissions, letting you fine-tune which endpoints a client can call. That flexibility turns header based authentication from a simple gate into part of a broader access control strategy. Your filter should also assign the READ_DATA authority so the annotation has something to check:

You can also secure endpoints by grouping them under a common path and applying rules in the security configuration. This avoids repeating access control annotations on every method.
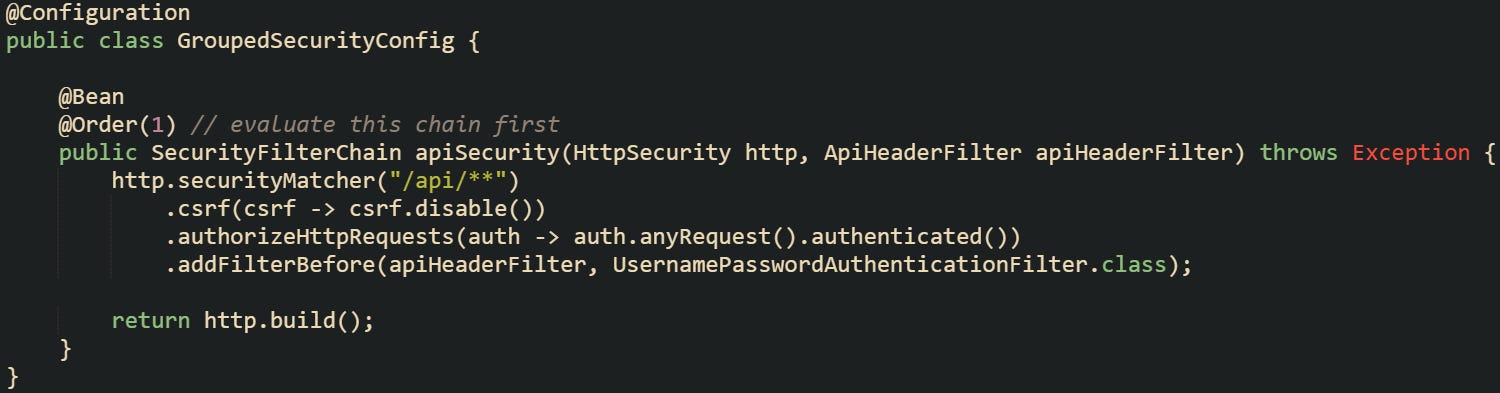
This configuration covers every endpoint that begins with /api/. A request to those paths will stop at the header check first, and only valid ones move forward to a controller. Grouping paths like this helps manage security as an application grows, because you can separate rules for internal APIs, admin routes, and public endpoints without editing controller code.
Conclusion
Header based authentication in Spring Boot works through a predictable chain. Each request enters the filter layer before reaching a controller, headers bring the token, the filter checks and validates it, and the security context records the outcome so later code can tell if the request should be trusted. That steady process is grounded in how Spring Security intercepts traffic and makes for a dependable way to guard API endpoints.