How to Write an Audit Query That Tracks Every Change in SQL
Logging every update without losing the past


Tracking data changes comes up in just about every production system. You’ll run into it when something breaks and you need to see what changed, or when you’re asked to pull a history report for compliance. Sometimes you just need to see how a record ended up in its current state. Some databases have built-in tools, but the most common way to handle it is with a history or changelog table that keeps track of what changed, when it happened, and who made the change. When that data is being captured, writing a query that compares different versions takes a bit of planning and a solid grasp of how those records are stored.
Tracking Data Changes with History Tables
The usual fix is to save the old row before it’s overwritten. That extra table holds the older version, and over time it turns into a full record of what each row looked like across different points in its life. Some people call this a history table, some call it a version table. Either way, it’s built around the same idea, keep the past intact.
You can set this up to work quietly in the background with database triggers. Every time a row gets updated or deleted, the trigger steps in and grabs a copy of the old version before it disappears. That copy gets written to the history table with a few extra details to help tell the versions apart. After that’s in place, the history table becomes a timeline you can query against.
What Goes Into a History Table
A history table usually matches the layout of the original table but adds a few more fields to track when and how each version was created. You’ll want a timestamp to show when the change happened, a version number or sequence that lets you order the changes, and something that shows what kind of change it was. Many setups also include the username or system ID that made the update, which makes it easier to trace.
Say you’re keeping history for a basic accounts table that has an ID, a name, and a balance. The history table could look something like this:
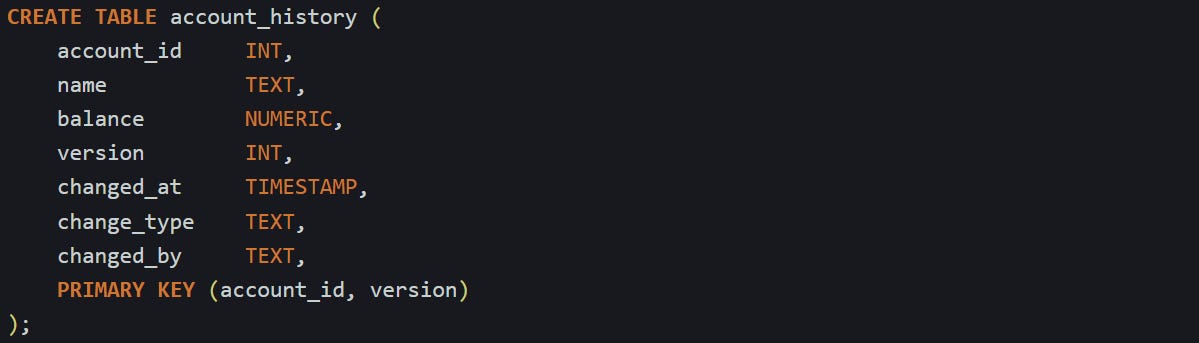
The version column helps you keep track of the order, and the change_type field stores whether the row was inserted, updated, or deleted. You don’t always need the full text label there, but it helps when you're reviewing changes manually.
To keep this table up to date, you can add a trigger to the original table that runs on each change. In PostgreSQL, this is usually done with BEFORE UPDATE and BEFORE DELETE triggers, which let you access the row before it gets changed or removed. Here’s one way to do it:
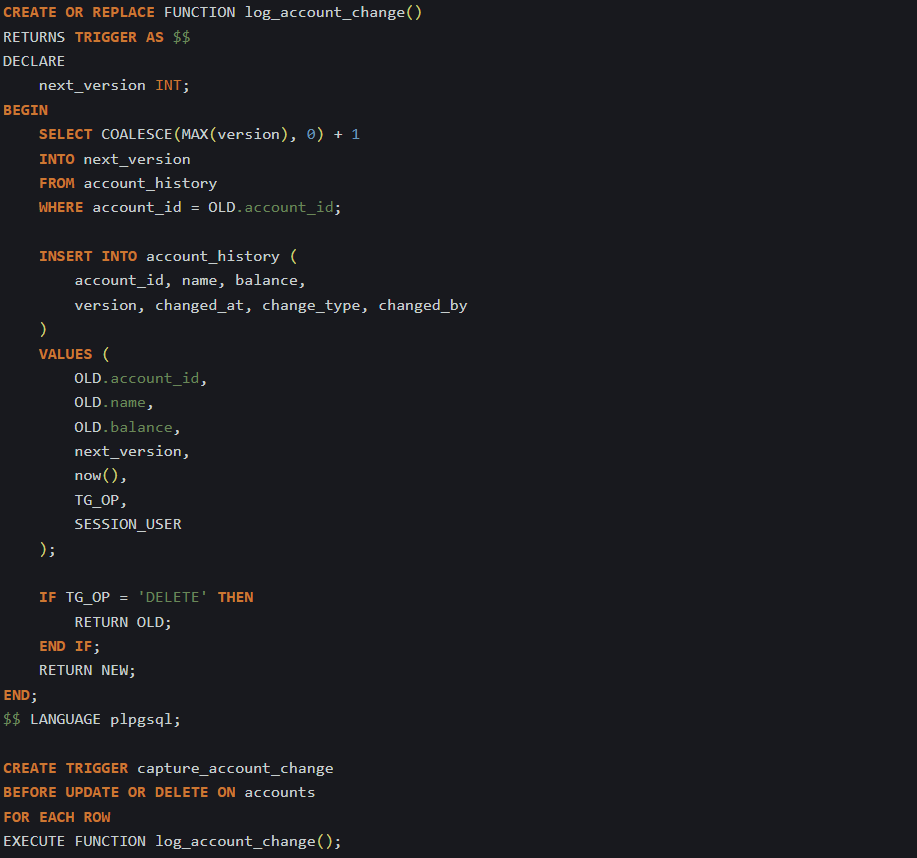
This function figures out the next version number for that specific account and inserts the old row into the history table before the change is saved. The trigger makes it automatic, so nobody has to remember to log anything manually.
Reading and Comparing Changes Over Time
When your history table starts filling up, you’ll want a way to look at the differences between versions. It helps to start by lining up each version with the one that came before it. That’s where window functions are useful. The LAG() function lets you grab a value from the previous row in a group, so you can compare fields between versions without joining the table to itself.
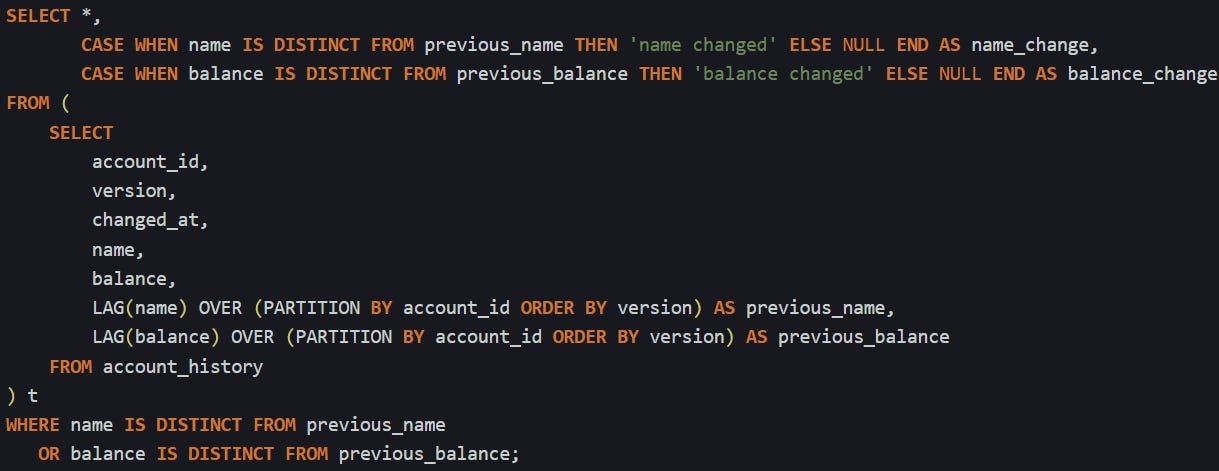
Here’s a query that pulls the current and previous balance side by side:
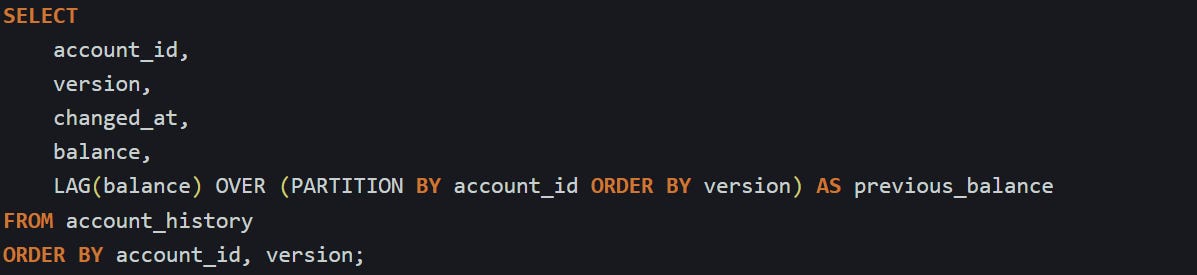
This is a balance for each version and the one before it, sorted by version number. After you have that, you can focus on rows where something changed. Maybe you’re only interested in accounts where the balance shifted. That’s easy to pick out once you compare the current and previous values.
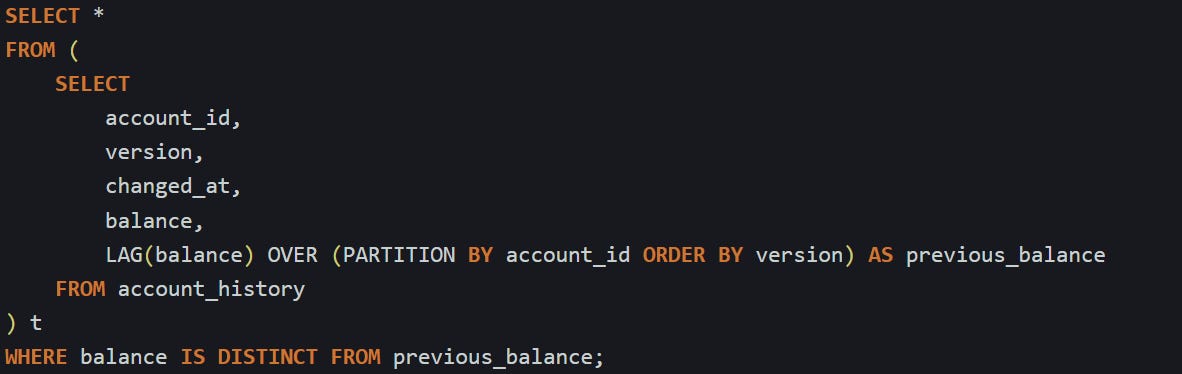
The IS DISTINCT FROM operator works better than just using <> because it treats nulls properly. If a value changes from null to something else or back, this still catches it.
You can use this with more than one column too. If you want to track changes in both the name and balance, just add another LAG() for the name and include that in the comparison as well.
That gives you a log of exactly what changed between each version. You can group this, filter by time, or export it into a report. Since the full contents of each version are stored in the table, you can also recreate what the entire row looked like at any moment without needing to calculate the difference. And because every version is captured, you’re not locked into a single way of reading the data.
This works well when you need to trace updates or build a readable audit trail. You can answer questions like “when did this field change” or “what was the value before the update,” without needing extra logic. The version history stays in one place, and once it’s built, it holds up with minimal effort.
Changelog Patterns That Work in Practice
Not every team stores full copies of each row when something changes. Sometimes that’s too much data to hold on to, or it just doesn’t match what the team needs. In those cases, it can make more sense to store only the fields that changed, and keep one row per change. That’s the basic idea behind a changelog table. Instead of showing what the row looked like, it focuses on what was different. This format tends to be lighter, easier to scan for specific field updates, and more focused when all you care about is the actual delta.
This style is used a lot in systems where accountability matters or where field-level auditing is a requirement. It also works well when you’re building change tracking for UI components that only need to show what got updated last. Compared to versioned snapshots, it’s a more granular way to store change history, but it gives you different kinds of answers.
Building a Simple Changelog Table
A changelog table doesn’t need to mirror the structure of the original table. Instead, it logs field-level updates as their own entries. Each time a field changes, that update becomes its own row. If someone updates three columns in one row, that means three changelog entries, one for each field.
Here’s a basic table layout that handles this format:
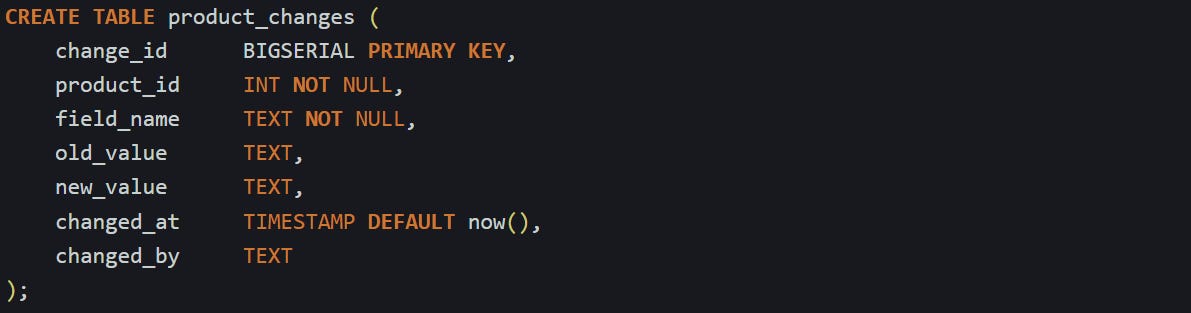
This keeps each change isolated. Instead of trying to reconstruct entire row versions, this lets you focus on which column changed, what the old value was, and what it turned into. This design is especially useful if you want to build a change log view in the frontend, where each update shows up as a small patch in a timeline.
If you’re logging changes in a table like products with fields like name, price, and status, you’ll want a trigger that runs on update and compares old values to new ones. If the value changes, it records that difference. Here’s one way to build that:
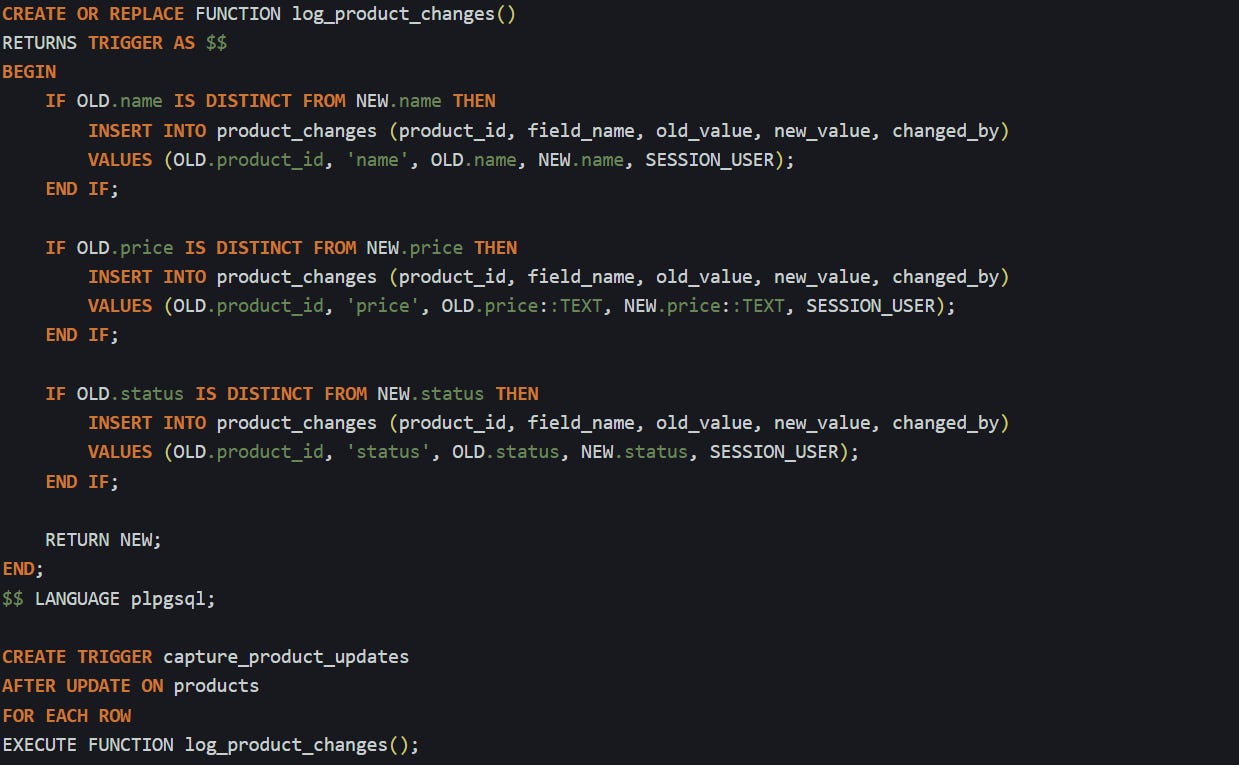
This only runs when a field actually changes. If the update doesn’t touch a specific column, no log gets written for that field. That keeps the table clean and makes sure every row in product_changes represents something meaningful.
You can query this log easily when you want to see what changed over time for a single product:

You will get a time-ordered list of changes with field names and value differences, which works well for UI timelines or audit reports. Since each row stands on its own, you don’t have to do joins or window functions just to answer “what changed last Tuesday.”
Something to keep in mind is that everything goes in as text. That’s why the price field is cast to text in the trigger. This keeps the format consistent, which helps when building queries or reports, but it also means you don’t get numeric comparisons inside the changelog. That’s usually fine, since the main job of this table is to describe change, not do math.
Grouping Changes Into Sessions
Tracking field-level changes is great, but it can start to feel noisy when you’re dealing with complex updates that touch multiple fields at once. That’s where grouping changes together into sessions helps. A session shows which changes were made together, as part of the same user action or transaction. There are a few ways to group changes like that. One option is to add a change_group column and set its value manually from the application, usually by generating a UUID when a change starts. That UUID gets passed to every insert into the changelog while that change is happening.
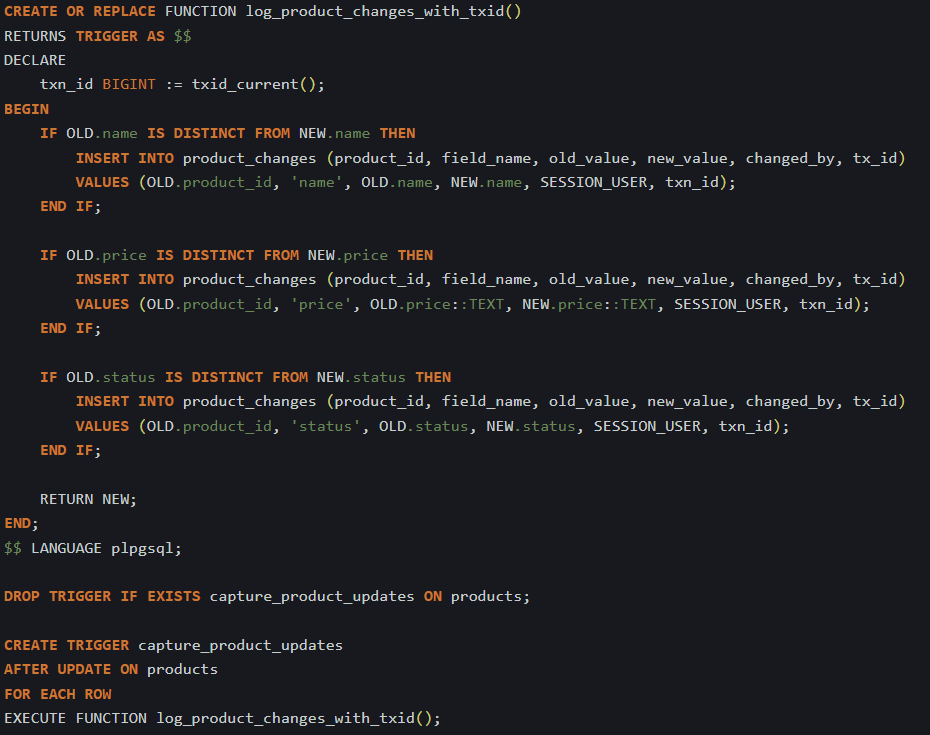
But if you don’t want to pass that value through your app, PostgreSQL gives you a way to group changes by transaction. The txid_current() function returns a numeric ID that stays the same for the duration of a transaction. You can use that as a way to mark all related changes.
First, add a column to your changelog table:

Then update your trigger to include the transaction ID:
With the transaction ID stored, you can now group changes that happened together by querying with that ID. You can also add timestamps to help sort them or to figure out which group came first. If you want to list each group with a summary of what changed in it, that’s easy too:
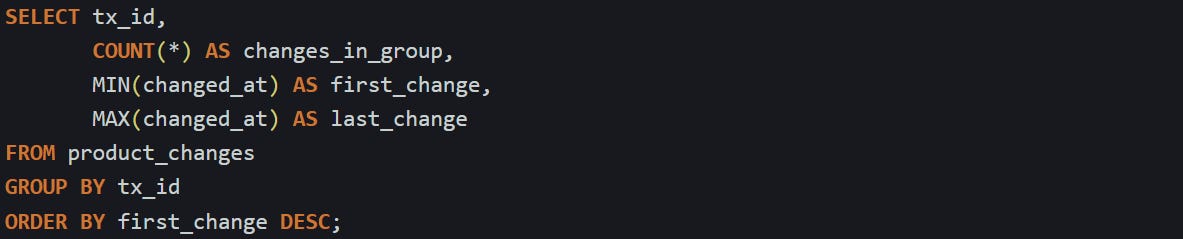
This gives you a timeline of change sessions with the number of field updates in each one. You can then drill into any group with a follow-up query:

This pattern makes it easier to read through change logs without getting lost in single-column noise. When multiple fields change at once, they stay linked together. You can see the full shape of what was updated and when it happened, all in one place. That connection between changes makes audit trails more readable and helps when you’re tracing what a user did during a single update or fixing a bug that happened across several fields in one go.
Conclusion
The way you track changes in SQL depends on how the data gets stored and what you need to ask later. Version tables hold full copies so you can line things up and compare one version to the next. Changelog tables break things down by field, so each update stands on its own. Both patterns lean on basic mechanics like triggers, timestamps, and sequence markers to make it all work behind the scenes. With the right structure in place, you can trace anything from a single field update to a full set of changes across a session without much friction.
